DIY Frame TV: Save Yourself a Thousand Dollars
If you’ve been wanting to invest in a frame TV, WAIT. Did you know you can make ANY smart TV into a frame TV? You don’t need a new TV.
It only takes a few pieces of molding, 4 brackets and some paint. The entire process requires about 2 hours in total and even a beginner can do it. (Keeping it real, my door is filthy).
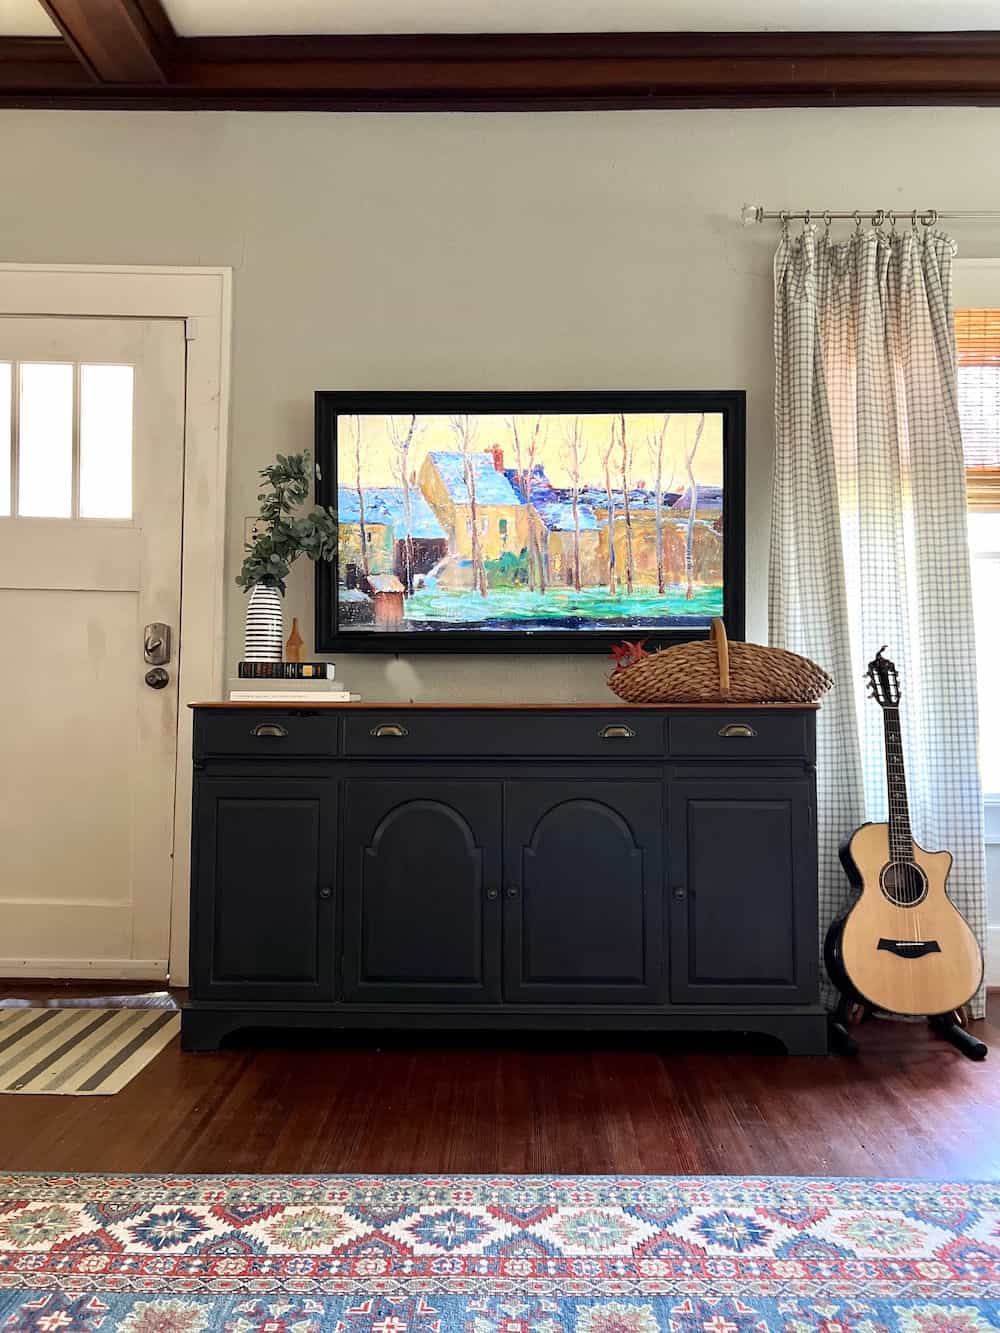
The secret of this frame is that it IS NOT attached to the wall. The frame hangs from the top edge of the TV and can easily be lifted off.
Tools needed to Make a Frame TV
I choose every product I review. I may earn a small commission if you buy from one of the product links, at no extra cost to you. This income supports this site. See the full disclosure.
- Molding – I purchased the trim pieces from Home Depot, enough to cover 4 sides of your TV plus 4 inches on each side.
- Miter box
- Saw – You can cut the molding with a hand saw and a miter box if you don’t own a table saw
- 4 Corner flat “L” brackets
- Piece of one-inch thick plywood, you need two small pieces to form a t-shaped hanger
- Paint your color choice
- TV mount – These are available at Home Depot and Amazon. Be sure you get one that swivels if that’s important to you.
- Painters tape.
- Digital Art – You can use a number of programs to get digital art onto your TV. I’ll share more about these below.
Optional Materials
You can use wood glue (if you have time for it to dry) or quick set epoxy if you’re in a hurry. Apply to the edges and use corner clamps to hold the corners together.
Once the glue dries you can fasten the flat L brackets to the back. If you have a helper who can hold the frame together while you screw in the L brackets, you can skip this step.
Steps to Make TV Frame
The first step is to mount Your TV to the wall. I used a simple, fixed wall mount (my TV doesn’t swivel). Use painter’s tape on the wall to mark where the edges of the TV should be. This step makes it easier to see where to hang the mount.
Measure the top and bottom edges of your TV. Measure the sides of the TV. Get enough molding to cut the frame sides. Add a minimum of 4 inches to each side to allow for angle cuts to be made.


Cut molding using a 45-degree angle to make the four sides of the frame. It’s easy to measure wrong, so be sure to measure at least twice.
If you want to glue the edges before you secure the L brackets, use a toothpick to apply wood glue (or epoxy) to the cut edges. Let them sit until the glue sets.


Flip the frame so that the backside is up. Secure one L bracket to each corner. Be sure to test the screw length first to make sure they won’t break through to the front of the frame (screws are shorter than the depth of the frame).
Hold the frame up to your TV to be sure it is the right fit. Mark in pencil the center of the frame. Measure the distance between the top of the frame to the wall.


The secret of this frame is that it IS NOT attached to the wall. The frame hangs from the front of the TV. It can easily be lifted off and easily adjusted just in case the frame covers part of the tv sensor. I ended up adding some velcro to my frame hanger to raise it up a little bit.
The final step is to paint the frame. If your wood is rough give it a good sanding first. I used pre-primed molding and didn’t sand it You can use any color that will accent your furniture. I think because the TV itself is black that the black frame blends into the TV screen.
Digital Art For your Frame TV
There are many apps available no matter what kind of smart TV you have. The two programs that I tested are Pixart Gallery and Art Cast. Both of these apps have “in-app” purchases for most of the art. The fact that many of the pieces of art are well known means that your guests will probably know that it’s not a real piece of art. In my opinion, it still looks so much better than a black shiny rectangle on the wall.
Pixart Gallery has a limited number of free art to choose from, but I found Art Cast required a subscription for all of the art. Pixart Gallary has a monthly subscription of $3.99 to access thousands of pieces.
The best part of making the frame yourself it that you save thousands of dollars on a new TV.


Andrea, I didn’t know you knew how to do this. Don’t you think I should do this with the pool house tv? And I love the thought of having art images instead of the dark screen. I am sending this to Scott to make. Such a great post! Thanks.
This is such a cool and classy idea! I also love the idea of running digital art on it as well. What a brilliant idea friend!
Wow – great idea Andrea! I love those frame tv’s but this is way cheaper. Thanks for the app info too – I didn’t know they had them separate from the tv. You always come up with the best stuff! 🙂 Happy Sunday my friend!
Hi Andrea,
Iyou come up with the best ideas and I need inspiration for shelves on either side of the fireplace. Very long, narrow room and mantel is only 5” deep.
Can I send you a pic?
Thanks,
Carol Anderson
Carol,
Yes please send a pic. I would love to see what you’re working with. You can email me at [email protected].
Andrea
Can you do this if the tv isn’t mounted to the wall? Mine swivels.
Thanks,
Donna
Donna,
The wood that sits over the top of the TV would sit there even if your TV swivels. You might want to add a few other attachment points, sticky command strips, to the side. It would work though.
Hope this helps.
Andrea