Painting On Fabric – A Beginner’s Project
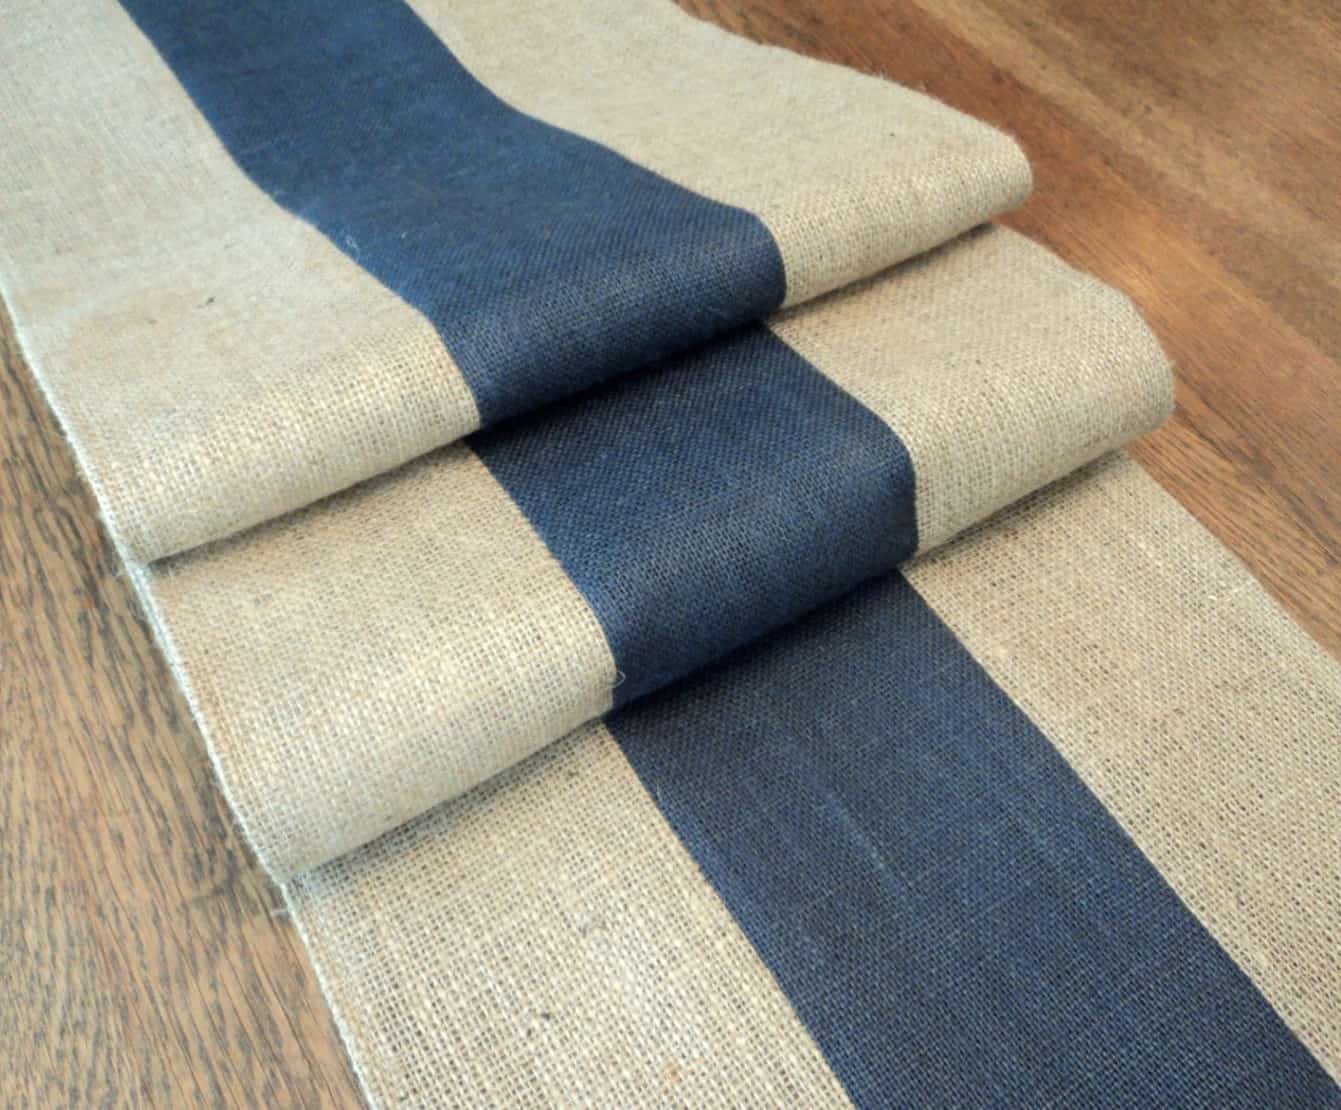
Welcome to this month’s craft hop. If you are here from Celebrate and Decorate, you might not know that I recently I shared a table runner I found on Etsy that I really liked (in this photo). When I saw this runner, it immediately showed me how to use some leftover burlap fabric.

Do you get ideas to try from things you want to buy? This happens to me all the time. I see something and think, I wonder if I could make that. I never had time to try until I turned 50.
I’m learning as I start making things that there are two types of people. There are people that start a project and they keep at it until the project is perfect. These people might complete fewer projects, but the ones they do complete are amazing. This is not me.
I’m in the second camp of people that love the idea of a new project, but halfway through my mind has already moved on to the next project. I can complete a lot of projects, but they are always far from perfect. Which camp are you in?
This week I’m teaming up with some blogging friends to share crafts. If you are here from Celebrate and Decorate, Chloe is in the first camp. Her projects are always perfection. You can see all of the crafts listed below.
Materials needed to paint a fabric Runner
The best way to make a burlap runner is with leftover fabric. If you don’t have any leftover burlap, you can buy it almost anywhere. I also used leftover paint, but you can use spray paint or fabric paint.
I choose every product I review. I may earn an affiliate commission if you buy from one of the product links, at no extra cost to you. This income supports this site. See the full disclosure.
- Burlap fabric – already cut to 14 inches
- Mod Podge – this helps to seal the edges of the burlap so it doesn’t fray
- Fabric paint – I used black, but you could use any color
- Frog tape – or any kind of painters tape
Steps to make a painted fabric runner
Step 1 Measure and Cut – Every project that includes fabric, includes lots of measuring. First, decide if you want your runner to flow off the end of your table or just go to the edge. If you want one longer than the table add 10 inches to the length of your table so you have 5 inches to drape off each side.
Next, consider the width of your table. I made my runner 14 inches wide. Cut the fabric to the right length and width for your table. No need for extra fabric for a hem with burlap. Burlap has an edge that naturally frays.


Step 2 Iron and Fray – Iron your fabric so it’s ready when you begin to paint. To create a frayed rustic edge, you just pull on a thread from the end to pull. This depends on how big you want your frayed edge to be. If you want 1/4 inch of a frayed edge, pull a thread that is close to the edge.


Step 3 – Apply Mod Podge – Burlap will continue to fray unless you do something to seal the edges. You can paint a thin coating of Mod Podge to the edge of your fabric. When it dries you won’t be able to see it, but it helps to keep the fabric from fraying more.


Step 4 – Tape Stripe – Time to get the fabric ready to paint. Decide how wide you want your stripe to be. If you want the stripe to be 5 inches, go to the middle of your runner and mark off 2 1/2 inches on each side. Add frog tape to the fabric to outline the stripe.


Step 5 Shake and Paint – I used chalk paint because I had a small can leftover. You can use fabric paint too (more on that below). Chalk paint as it comes in the can is too thick. Fortunately, chalk paint is easy to thin out. I used about one part water to one part paint or until I got a consistency I liked. Then it was very easy to apply with a brush.


Pro tip – On burlap it’s easier to use a bristle brush instead of foam. The foam picks up hair on the burlap.
Step 6 Remove Tape and Dry – Remove the tape before your paint is dry. If you have any drips on your fabric while painting wet them down thoroughly right away. I used a few drops of shout on my mistakes.
The paint can be sealed into the fabric using wax or heat. I let my runner cure/seal in the sun for a few hours (it’s 100+ degrees here). If you want to use an iron, it’s best to either iron the wrong side of the fabric or place a cloth over your fabric between the paint and the iron.


I think this color is fun for fall and I will use it for Halloween with black iron pumpkins. Have you ever tried painting fabric? If you want more information on painting fabric, see my tips for painting on fabric below.
Crafts you have to see
Now it’s time to visit some other blogs to see what crafty ideas they have.
Celebrate and Decorate | Design Morsels | My Thrift Store Addiction
Debbees Buzz | My Family Thyme | White Arrows Home
Home Is Where The Boat Is | Chas’ Crazy Creations | B4andAfters
The Painted Apron | Purple Hues And Me | Bluesky At Home
Zucchini Sisters | My Hubbard Home | Birdz Of A Feather

Painting on Fabric
This was my first time painting on fabric and I learned a lot. Here are my tips for painting fabric.
Type of Paint for fabric
Use an acrylic-based paint. This lets you add water to the paint to get the right consistency. There are several paints that are made specifically for fabric. If you are going to use the fabric next to your skin, use one of these, Tulip fabric paint or Tulip spray paint.
How to Set Paint on Fabric
To set the paint you need to use heat or wax. You can use an iron after you paint to set the paint. You can also use wax to seal fabric but I don’t recommend this if you are going to sit or lean against the fabric. This is a personal preference, it isn’t that the wax won’t seal the fabric but I don’t like the tacky feeling of wax on fabric. It makes your fabric feel more like leather.
best fabrics to paint
The best fabrics to paint are natural fibers like cotton, linen or rayon. Painted fabric is not soft unless you use a paint that is specifically designed for fabric. I don’t recommend for fabric that you will sit on. I recommend it for things that are displayed (like curtains, table runners and pillows) rather than things that are comfortable (like chairs and upholstery that you USE). I’m not addressing painted clothing, because that’s not my area.
If you paint on a drape or upholstery fabric where both sides are visible, you might need to paint both sides of the fabric.


Your runner turned out so professionally done Andrea! It looks great on your table! Thanks so much for all your hard work on this blog hop, keeping us organized and informed!
Andrea, I’m so in the second camp with you!
This is a perfect runner for Halloween. I can see it with orange pumpkins down the middle of it.
Thanks again for putting the hop together!
Andrea, great tutorial. Adding the stripe down the middle of the stripe is a nice look for a natural look that will mix with any styles. I use GelArt Ink from A Makers’ Studio. It was made specifically for fabric. Thanks for hosting.
I love this runner, Andrea! The black stripe is perfect for Fall and Halloween decor. Thanks for the tip about using mod podge to keep burlap from fraying. I’ll have to remember that! The runner looks great on your black table. Thanks for sharing and for hosting this fun hop!
Love your burlap runner Andrea! All kinds of spooky fun ideas are running through my head seeing your smiling JOL in the background. Thank you for your organizing efforts and happy to be crafting with you today. ♥
No, I don’t think I have painted fabric. It does seem like a challenge. Thanks for sharing!
Liberty
Thanks for the tip. I will try it.
Your runner looks fantastic Andrea! Love it! Wonderful craft hopping with you friend!
Andrea, what a great project idea and helpful DIY tutorial. I never knew about applying Mod Podge to stop the fraying — a great tip, thanks! I wonder if it would also work with the ends of Deco Mesh? Gonna give it a try. As to what camp I’m in, hmmmm. Not really sure. I wouldn’t say I achiever perfection on projects, but I do stick with one until finished. For the wine cork wreath, I had to change my method of attaching corks three times lol!
How pretty, Andrea! Burlap is such a nice choice to transition from summer to fall! Thanks for organizing the hop. Blessings, Cecilia @My Thrift Store Addiction
Fabulous project Andrea! I’ve been wanting to make a new runner for the longest time so am definitely going to try this out. Believe it or not, I can be in any camp. It really depends on my energy level – lol! Of course, I team up with Hubs so projects always tend to do a lot faster when you have two people working on them!
Lucky girl! My hubby has less than zero interest in DIY, but my handyman is super helpful, thank goodness.
Your lovely burlap runner adds a beautiful touch to your table, Andrea! And the stripe takes it to a whole new chic level. It’s comforting when you can look at a finished project and say, “oh my, it turned out fabulous!” Thanks for organizing this awesome blog hop! It’s one of my favorites!
Great project! The thing I love about visiting other blogs and seeing their projects…I learn things! I had no idea about painting the edges of burlap with Mod Podge would keep it from fraying more! Thanks for your help with setting up the hop and best wishes to you with your upcoming craft blog hops!
This is such a beautiful idea Andrea! I am so inspired!
What a great idea – your runner is lovely! Thanks for the inspiration and the tips too! Happy Fall my friend!