Foolproof Gallery Wall Formula For A Curated Look
Today I’m answering one of my most frequently asked questions, how to put together a gallery wall. If you’ve got a blank wall in your home, a gallery wall can be a great place to display your own personal style, to showcase your own personality and style.
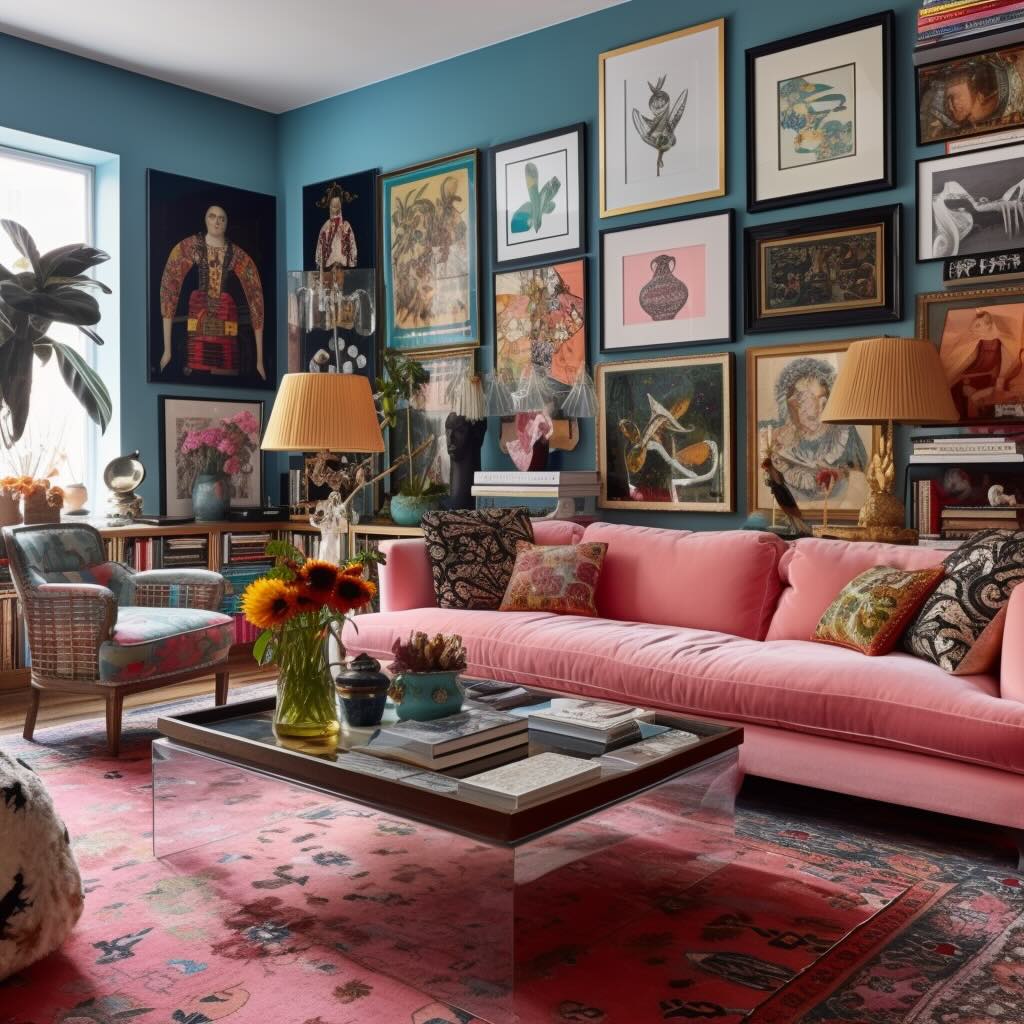
Whether you’re dealing with a big empty space like this, or just a small corner that could use a little something extra, a gallery wall is a great way to add personality to your space.

From selecting the artwork to hanging it, I’m going to give you the six steps that I use to put together gallery walls.
And the hardest part is just making the decision “I’m going to do it” and giving yourself a time frame. Because I find that buying art can be one of the hardest things to do in your room and it’s often the last thing that you do.
Step 1: Choose a Theme
If you already have all of the artwork that you want to put into your gallery, then just skip to the next step. But for most people, they don’t really know if the pieces go together, and they haven’t picked out all the pieces. So if you decide to go with a theme, it can be an easier way to come up with a collection that goes together.
And I’ll give you a couple of ideas for what I mean by theme:
- You can choose to hang all portraits
- You can choose to hang all landscapes
- You can choose to hang all things that are depicting a certain place
- You can choose all black and white
- You can choose all floral
- You can choose to have lots of different things, but all in the same frame
- You can choose all abstract

And just to give this gallery wall as an example, I didn’t own any of these pieces when I decided. I decided the theme I was gonna go for was “red and looks Parisian to me.”

So if you’re looking for inspiration for themes, you can look on Pinterest, and you can actually look on Etsy and get a lot of inspiration if you search for gallery walls.
Symmetrical vs. Asymmetrical
While you’re thinking about the theme, you should also consider whether you want your gallery to be symmetrical or asymmetrical. So a symmetrical gallery, all the pieces are the same size, and there’s typically like nine pieces or five pieces. And this one is an example of asymmetrical where all the pieces are different sizes.

And that can have a little bit more of an eclectic feel, whereas a symmetrical gallery has a little bit more of a traditional look to it.
Step 2: Measure Your Space
The second step is a quick one. You want to measure out the size that you’re trying to fill. Like, is it 9 feet by 5 feet? And you want to include all of the spaces between the artwork, just the total amount of space that you want to cover.
Step 3: Choose the Pieces
If you have no idea where to begin, start with one anchor piece because that can give you something to work around for the rest.
Just as an example, this is not expensive – this is like a poster – but it is a bicycle which I knew I wanted because we like biking and it looks like a bicycle sitting against a wall in Paris. So, I use that to set the theme of my gallery, and then I could work the pieces in around it.
Add Dimension with 3D Elements
One thing you can add to your gallery that gives it a little bit more interest is to put something sculptural in your gallery. And that means something that’s not art. It’s three dimensional. Like:
- A basket
- A clock
- A piece of fabric
- A mask
- A hat
- A musical instrument
- A sconce
So think about these alternative things when you’re putting together your pieces.
Use a Mood Board to Preview
When I’m selecting my pieces, if I don’t already have them, I like to try them out together on a mood board. I have a tutorial here on how to set up a mood board in Canva, but that is the perfect tool for seeing if artwork goes together. And a lot of the artwork that you’re going to find is scalable, so you can change the size to see how it looks.
Where to Shop for Art
Some of the places that I like to shop for art are:
Etsy: I’ve got several of these pieces from Etsy. This one is from Etsy, this one is from a painter in France that I got on Etsy, this one is from a painter in Ukraine, but they came from all over the place. And that’s what I love about Etsy is you can really get one of a kind pieces. And sometimes you can even tell them, “can you make it this size?” And I really like that.
Minted: This is a great place to go and they also will mat and frame the artwork for you. They have every different style. You can set it by color.
Artfully Walls: A great place to get a curated collection.
Downloadable Art: One thing you can also do on Etsy, they have sellers if you search for “Gallery Wall Art” that sell expired copyright downloadable artwork. And what that means is the artwork is free to anyone. They’ve just collected it in a place where you can easily download it. You can print any size or have it printed in any size. And often they show you arrangements of different pieces of art and it can help you come up with ideas for which pieces go well together. And you can get one download for $11 – the expensive part is printing it and getting it framed. But it can be a really great thing to do if you have no idea what you want to hang.
Step 4: Test Out the Arrangement
If you haven’t bought any of the pieces, test them out in a mood board. If you already have them, then you can test them out by grouping them together on the floor. That’s something that I like to do when I’m trying to pull a bunch of different pieces and I’ve never hung them together. I’ll just lay them out in the living room and try rearranging them in different ways because that helps me see what it’s going to look like up on the wall.
One of the tips for doing that is to start with the biggest piece first, if it’s an asymmetrical arrangement. Put the biggest piece down and then work your way out from there.
Step 5: Frame Your Art
The next step is, if your pieces are unframed, to have them framed or to buy the frames. And one of the places that I’ve used that is very budget friendly frames is called Frame It Easy. And they will also send you the mat. They’ve got lots of different styles.
No, they’re not sponsoring this – I’ve just used them a bunch before. But you basically have to assemble the frame yourself. And it’s an inexpensive way to frame art.
It allows you to frame it with where it’s floating, because there’s a mat behind it which can kind of make your artwork look a little bit more elevated if it’s floating.
One of the other places that I love to get frames if I’m on a really tight budget is IKEA.
Step 6: Hang Your Gallery Wall
And the last step is just to hang all the pieces once you have them all. There are lots of tutorials out there to show you how to hang them. I have one here where I talk about hanging a gallery wall of photographs. But what I like to do is to start with the centerpiece and hang it first.
There are also tutorials out there where you cut a piece of paper to the same size as all your artwork, and you put that up on the wall first. And if you are a really detailed person, that is a great way to do it. I am, that sounds way too complicated for me, I like to do something simpler and that is just to hang it. Even if I poke a few extra holes in the wall because I have to move a piece two or three times, those holes are easy to patch.
Even if you’re a renter, hang the big piece first and then work your way out around that. You want about three inches between the pieces, but you’ll be able to see as you’re hanging, as you’re setting it out on the floor, “Oh, these two pieces need to move up” or “these two pieces need to move down.” You’re going to be surprised at how easy you’ll be able to see the proportions.
And that’s it. Those are the six steps to create a gallery wall. And if you’re struggling with choosing art, I’ve got an article here where I talk about an easy way to kind of narrow down what kind of art you want to hang. And if you have questions about your artwork and how it goes together, you can send me an email or leave a comment and ask any questions you have!


